Desktop Client
WebDAV - Windows
Connect securely to Scramble Cloud via WebDAV and access your encrypted files in Windows File Explorer like a regular drive.
⚠️ Note: WebDAV requires a Premium account. If you have a Freemium account, use Scramble in your browser or upgrade to a monthly or lifetime subscription.
Auto Mount Setup Guide
Before you begin
You need:
- Windows 10 or Windows 11
- the latest version of Scramble Desktop
- a Scramble Premium account
- an internet connection
Step 1: Close Scramble completely
If Scramble is currently open, close the app before installing the prerequisites. Open it again only after rclone and WinFsp have been installed.
Step 2: Install rclone
- Open the Windows Start menu.
- Search for Terminal and open Windows Terminal or PowerShell.
- Copy this command into the window and press
Enter:
winget install --id Rclone.Rclone --exact- Accept any Windows prompts with
Yor Yes. - Wait for the installation to finish successfully.
For additional information, see the official rclone website.
Important: Do not run
rclone config. Scramble automatically creates a protected, temporary rclone configuration while mounting.
Step 3: Install WinFsp
WinFsp is required on Windows so that rclone can provide a real drive.
- Open the official WinFsp download page.
- Click Download WinFsp Installer.
- Open the downloaded
.msifile. - Keep the installer’s default options and finish the installation.
The additional developer files are not needed for Scramble. A Windows restart is normally not required.
Step 4: Check the installation
- Close the terminal you used earlier and open a new terminal.
- Run these commands one after the other:
rclone version
where.exe rclone
If you see an rclone version and a path to rclone.exe, rclone is installed correctly.
Step 5: Configure WebDAV in Scramble
- Open Scramble Desktop and sign in.
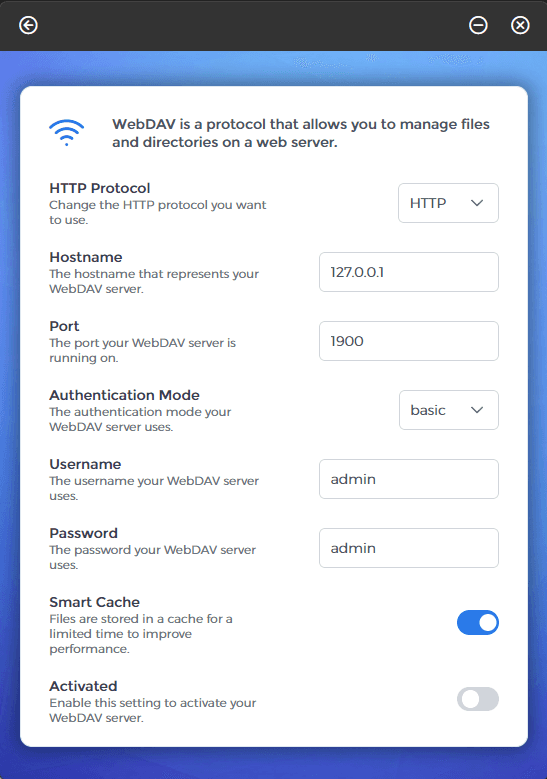
- Open the WebDAV settings.
- Keep the Activated switch turned off for now.
- Use these settings:
- HTTP Protocol:
HTTP - Hostname:
127.0.0.1 - Port:
1900 - Authentication Mode:
basic - Username: choose any name, for example
admin - Password: choose your own password
- Smart Cache: recommended on
- HTTP Protocol:
Step 6: Enable Auto Mount
- Scroll to the WebDAV Mount section in the WebDAV settings.
- The yellow “rclone is required for Auto Mount” warning should no longer be visible.
- Select an unused Drive letter, for example
Z:. - Enable Mount automatically after the server starts.
- Also enable Start Scramble when signing in to Windows if the drive should be available automatically after every sign-in.
- Now turn on Activated at the top of the WebDAV settings.
Scramble starts its local WebDAV server and mounts the drive automatically. No manual rclone configuration is required.
Step 7: Check the drive in File Explorer
- Wait until Scramble displays Mounted at Z: or your selected drive letter as the mount status.
- Open Windows File Explorer.
- Select This PC.
- Open the new Scramble drive.
Auto Mount is now ready. If the Scramble WebDAV server was already running when you enabled Auto Mount, you can click Mount now instead.
If it still does not work
- The yellow rclone warning remains visible: Close Scramble completely and open it again. Then use
where.exe rcloneto verify that Windows returns a path torclone.exe. - Mounting fails: Check that WinFsp is installed and that the selected drive letter is unused.
- Scramble reports an authentication error: Use the
basicauthentication mode for Auto Mount and verify the username and password. - The drive does not appear after signing in: Enable both Mount automatically after the server starts and Start Scramble when signing in to Windows.
Manual Setup Guide
The following instructions describe the alternative manual setup through the Windows WebClient. Use the easier Auto Mount method above whenever possible. The manual method does not require rclone or WinFsp.
WebDAV Configuration in the Scramble Desktop Client
The following WebDAV settings are available in the Scramble Desktop Client:
- HTTP Protocol — Select HTTP or HTTPS.
- Hostname — The WebDAV server address, for example
127.0.0.1. - Port — The port on which the WebDAV service is available, for example
1900. - Authentication Mode — Choose between:
basic– sends the username and password over the local connectiondigest– uses hashed credentials
- Username / Password — Enter the credentials used for authentication.
- Smart Cache — Enables local file caching for improved performance.
- Activated — Enables the WebDAV service in the client.
Step 1: Configure the Registry
This step is required when using the basic authentication mode instead of digest.
- Press
Win + R, enterregedit, and confirm. - Go to this Registry path:
HKEY_LOCAL_MACHINE\SYSTEM\CurrentControlSet\Services\WebClient\Parameters- Set the following values. Create them if they do not exist:
| Key | Type | Value | Description |
|---|---|---|---|
| BasicAuthLevel | DWORD (32) | 2 | Allow Basic Auth over HTTP |
| UseBasicAuth | DWORD (32) | 1 | Explicitly enable Basic Auth |
⚠️ A system restart is required for the changes to take effect.
Step 2: Restart the WebClient service
- Press
Win + Rand enterservices.msc. - Find the WebClient service, right-click it, and select Restart.
- Set its startup type to Automatic.
Step 3: Map WebDAV as a network drive
- Open Windows File Explorer.
- Right-click This PC and select Map network drive.
- Enter the address, for example
http://127.0.0.1:1900/. - Enter the credentials configured in Scramble when prompted.
- The drive appears in File Explorer as a network location.
Alternatively, you can create a batch file:
@echo off
set DRIVE=Z:
set URL=http://127.0.0.1:1900/
set USER=admin
set PASS=YOUR_PASSWORD

net use %DRIVE% /delete /yes >nul 2>&1
net use %DRIVE% %URL% /user:%USER% %PASS% /persistent:yes
exit
Replace YOUR_PASSWORD and, if necessary, the username, URL, and drive letter with your own values. Only store a real password in a batch file if you understand the security risk.
Step 4: Increase the Windows Explorer WebDAV file size limit
When using WebDAV through the native Windows File Explorer, larger files may produce this error:
Error 0x800700DF: The file size exceeds the limit allowed and cannot be savedThe Windows WebClient limits file transfers to 50 MB by default. To increase the limit to approximately 4 GB:
- Press
Win + R, enterregedit, and go to:
HKEY_LOCAL_MACHINE\SYSTEM\CurrentControlSet\Services\WebClient\Parameters- Change or create
FileSizeLimitInBytes:- If it does not exist: right-click → New → DWORD (32-bit) Value
- Name:
FileSizeLimitInBytes - Base: Decimal
- Value:
4294967295
⚠️ A DWORD value can represent a maximum of 4,294,967,295 bytes. Restart Windows for the change to take effect.